08 April 2016

[Non]Update


Life.
Funny thing, it is.
Runs along like a serpentine stream.
Progress never stops,
but is diverted from time-to-time.


We currently rest in one of those diversions, and have for the past three years. With two kids, homeschool and time devoted to other creative passions, the blog has fallen by the wayside. I hated just to leave it silent (as I have for too long). For the one (or two?) of you who still check in from time-to-time or for the random Google-searcher who lands here (Welcome!), my intention is to return at some point -- at least to provide updated pictures of the various finished projects. Until then... 

25 February 2013

bathroom [tile]

Inching closer to the finish as tile begins...

First the shower tile:
P1080689

P1080712

P1080713

Then the Nuheat mat goes down directly on the subfloor:
P1080626

Schluter DITRA over that:
P1080691

And finally, the floor tile:
P1080717

14 February 2013

bathroom [planning & material selection]

P1080374

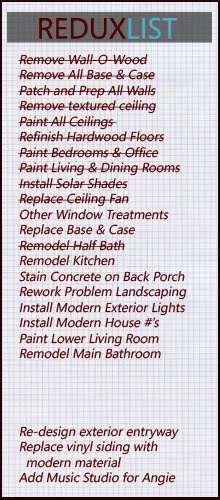
As you can see by looking at the Redux List on the sidebar, a complete bathroom remodel had been in the works since we purchased the house in 2008. And we had been saving links and pictures of ideas and inspiration along the way. Nonetheless, we still viewed the start date as a year or two away. However, there were two issues that drove this project to the forefront.

We believe the previous owners renovated the bathroom in the early-90s. That meant by the time we moved in, the toilet was approximately 16 years old. Almost from the start, it was apparent that the closet flange had rusted and the toilet was not securely fastened to the waste pipe. Two years later, the tank developed a leak. Although I could have replaced the gaskets and tank bolts, with a remodel down the road, I decided just to order another Toto Aquia. When I pulled the old toilet, the cast iron flange was completely toasted and I couldn't get a replacement ring fastened down because the subfloor did not hug the waste pipe -- so there was nothing solid to fasten it to. I tried my best with some blocking, and it held for a week (or two), but soon loosened again. Plus there were issues with the unique Toto flange adapter and the levelness of our floor such that I was honestly afraid that we would crack the porcelain on the toilet every time we gingerly sat down on it. When the plumber was there to finish the kitchen, he gave me an $800 quote to fix it. No way were we throwing that kind of money into a temporary fix when we knew we were close to a complete gut remodel.

The second issue involved the shower's water valve. It was approximately 16 years old as well and within the last 6 months, had become very temperamental in fully shutting off the water. And I'm not talking a drip (or even a fast drip). I'm talking a low flow stream of water coming from the spout when in the OFF position such that you'd have to turn it back on and off a few times in order to catch it just right. I feared that at any moment, we'd using the angle stop valve (accessible from a small access door in a bedroom closet) to turn the water on and off. Although I didn't get a quote on this repair, I assumed it would be a substantial undertaking and again, we didn't want to dump money into a short-term fix.

So as soon as the lower living room project wrapped up the end of November, we dove head first into planning the main bathroom. It was an intense time to plan a complete bathroom redux. A bullet list will make it easier to digest:

-Went through all our links -- kept the good ones, got rid of the bad ones
-Viewed our inspiration photos and jotted down our favorite ideas in a Word document
-Decided on a contractor (a process I explained in more detail here) and ensured that he was available and could complete the project on our tight timeline
-Visited R.F. Fager & Company, a local bathroom showroom/distributor our contractor works with and started building a materials quote list. Although I had already sourced many of our materials/fixtures, there were still some holes to fill, and I found that working with folks who do this for a living has advantages to simply researching and ordering everything online. In the end, I had a great experience working with Fager's.
-Visited every tile store within 10 miles of our home -- pulled samples from different ones and got prices while we were there
-Visited Fagers, Home Depot, Lowes and Just Cabinets to look at various cabinet options. Every store had something a little different to offer at different price ranges. Obviously some places (Fagers and Just Cabinets) were a bit more knowledgeable than others. Did layouts, got pricing and lead times (so important when you're on a tight timeline) at Home Depot, Fagers and Just Cabinets. Went through a number of redesigns at Fagers and Just Cabinets after meeting with our contractor.
-Visited nearly every countertop fabricator within 30 miles to hunt down a quartz remnant -- ultimately failed at this and ended up deciding on a new slab from Lesher Marble -- the fabricator that installed our kitchen quartz (and the first place we visited)
-Developed a specification list in Word that covered our desired materials, demo, rebuild and design choices. This spec list was heavily edited during the entire planning process and it was used as the main document when I did the walk-through with our contractor so he could develop a quote.
-Finalize material selections (cabinets, fixtures, tile, countertops) and get firm quotes to contractor.
-Review contractor's quote, let the initial shock wear off(!), get back with your contractor on questions/issues/possible cost cutting areas and then sign the contract and cough-up the down payment

Again, this is a bullet list. We hope to discuss more of these in detail in future posts. As we mentioned, the process started in late-November and we signed the contract in mid-January. Ideally, we would have loved to have taken three months to flesh out the details of this project, but the issues above and our second child due in early-March dictated otherwise.

If you've read along this far, we believe you deserve a peek at our final material selections. Shower tile on left. Countertop on left. Floor tile on right. Cabinet (Java Stain on Cherry wood) in back. Along with the various paint options.

P1080377

10 February 2013

bathroom [paint]

Sherwin-Williams 7506 Loggia on the roller.
Dubstep on the Pandora.
And we're good to go for a one-man painting party!

My "sword"
my "sword"

Zinsser Smart Prime
P1080613

Third (and final) topcoat
P1080668

05 February 2013

bathroom [drywall & kerdi]

Progress on the bathroom remains on schedule. Drywall was hanged and taped on the final day of the first week. The KERDI-BOARD went up the first day of the second week, as did the first coat of drywall mud. Here's what it looks like:

P1080583

P1080582

Little foreman on the job (note the OSHA-approved footwear):
little foreman

P1080607

Cool to see the shower niche take shape:
P1080609

KERDI sealed (middle of second week):
P1080623

P1080622

True Confession: I miss the open walls. I know drywall = progress (and gets us closer to having a shower again!), but there's nothing to look at anymore. With the open walls, I would go in there when I got home from work and just take it all in. Making mental notes that I hope will come in handy someday.

31 January 2013

bathroom [demo & rebuilding]

P1080550

After nearly two months of intense planning and material selection, the main bathroom renovation is underway! Although we've had a major hand in selecting every last detail down to the angle stop valve, this renovation is being handled by a general contractor, William Kenny, Inc, who I can't recommend highly enough.

With our second child due at the beginning of March, combined with the fact that this is our only full bathroom in the house, there was no way for us to undertake a full (or even partial) DIY renovation. As it is, we are going to be without a shower for all but three weeks, so we figured it would have taken us at least twice that long to complete, probably longer.

Choosing the contractor was actually the easiest part of the entire process. Will had originally been recommended to us by a guy who works for my Dad. Will's crew replaced both our front and back enterance doors (a project I've yet to post about) and did a great job -- they are excellent craftsmen, not simply just contractors. So it just made sense not to waste time going around with two or three contractors to get quotes -- the peace of mind that comes from knowing a job will be done right the first time outweighs a couple thousand bucks in the greater scheme of home ownership.

I'll be back (hopefully soon) with a post summarizing our planning and material selections. And with that, a few pics to document our progress...

Medicine cab mock-up
med cab mock-up

Plumbing rough-in at vanity
P1080553

New tub installed
P1080551

Electrical rough-in
P1080561

Shower niche framing
shower niche framing

Recessed lights installed
P1080562

Medicine cab framing
medicine cab framing

13 November 2012

work [in progress]


"Widespread rumors of this blog's demise have been greatly exaggerated."

-Troy Mouer, Kingswood Redux

Quick update: We have multiple renovations going at once and are trying to plan a complete main bathroom overhaul as well. Oh yeah...and a 2-yr old! So blogging has definitely taken a back seat to real life. BUT...we're still very committed to the blog and hope to bring it up to date at some point. We don't just want to show before and afters because those aren't the kind of blogs that we found helpful as we took on many first-time DIY tasks. As always, thanks for stopping by and stay tuned for more!

03 July 2012

storm

P1070786

The plan was to tile the backsplash this past weekend. We even had my parents lined up to watch the little man all day so we could focus on the task at hand. But then I woke up to the sound of chainsaws and no electricity on Friday morning. A quick glance out the window revealed the following...

P1070789

P1070782

P1070785

We were spared any damage to our house and only lost a few limbs. Our neighbors didn't fare as well:

P1070788

P1070791

P1070787
The bit of irony here is that my neighbor had just sealed his driveway the day before the storm, so his truck was parked on the street -- directly in the path of the tree that fell across the road from another neighbor's house.

The little man was glued to the window for a solid hour...
P1070781

We ended up cleaning up our own place and then helping some neighbors most of Friday and all of Saturday morning. Needless to say, Operation Backsplash was postponed. We'll be celebrating our freedom to tile on July 4. So whether you go picnic-style or DIY-style, enjoy the holiday!

10 May 2012

kitchen [countertops]

A number of readers have asked about our Cambria White Cliff countertops. We really like them! It's exactly what we were going for -- as pure white as you can get with quartz. However, there are two issues related to markings that need to be shared -- black spots and edge markings.

Black Spots
White Cliff has the potential to show black spots (but we knew that before-hand) -- ours has two.


Here's the background -- The following notice is found on Cambria's website and the back of the sample: "White Cliff™ is a unique, pure white color and can show markings caused during normal use."

I remember reading this just before we signed the contract with our fabricator/installer. Naturally, I needed to know more. Here's the email trail between me and the local fabricator/installer I was working with:

Me: Can you or your Cambria rep give any further insight on this statement -- its rather vague. I understand its a very pure looking color, with hardly any flecks/specks, but the finish itself is the same (as the Whitehall, for instance) and I'm not following how it will mark -- scuff? chips?

Local Fabricator/Installer: The further insight that I can offer you is what Cambri notes on our price list and I have copied and inserted below for you. The White Cliff is just as hard and “scuff proof” as any of the other colors in the line and equally as with the Caesarstone. BUT, we nor Cambria will address any dissatisfaction with regard to their precautions noted below.

White Cliff is an extremely pure bright white that will show markings during normal use. It may contain some small black or other color variations or spots and these should be considered during your layout process and worked around if possible. During the manufacturing process every effort is made to minimize these issues but they can not be totally eliminated. Please take extra care during your inspection and layout process to identify and address these issues.

It is extremely important that you educate your customers and set the correct expectations prior to starting any fabrication! Variation in the natural quartz in all Cambria color, pattern, size, shape and shade are inherent and unique characteristics are to be expected with the product. These variations do not affect product performance. Please be sure to thoroughly inspect all Cambria slabs prior to starting any fabrication. Thank You.

Edge Markings
After using the countertops for a week, we noticed that the edges show markings from where a belt buckle or jeans button would contact it. This is mainly apparent at the sink, where we do most of our leaning against the edge of the counter; but it also appears at any place where we do any amount of prolonged work. The good news is that we are able to wipe off these marks with a Magic Eraser.

Bottom Line
We'd make the same decision again!

Update: Having now lived with the counters for ~5 years, we would not make the same decision. If you'd like more info, drop us an email.

13 March 2012

minka


Sweepingly beautiful short film about place and memory, a farmhouse in Japan, and the lives of the people who called it home.


Redux Update...
Not sure I've completely drawn the picture here on the blog or not, but the kitchen remains in an unfinished state. The reasons are many and include (1) fact that as soon as we got running water back, all my drive to finish the details like cover panels, tile backsplash and trim vanished, (2) we're waiting on a custom steel railing to be installed and (3) the demo of the tile floor in the existing lower living room and all of the associated details concerned with choosing new flooring to put in its place, which has been complicated by the decision to install electric radiant floor heat. All of that to say, updates have been few and far between, but when I finally have a chance, there is plenty of material there to post about.

08 February 2012

interesting super bowl sunday was had here at kingswood redux
no parties to speak of, as house is in full redux swing
this was supposed to be a day of rest
but it turned out to be a major work day

story begins a week before, when the old maytag dryer stops working mid-cycle
appliance repairman says the motor is blown -- too much to fix

lots of internet research ensued
leading to the purchase of a new matching set

old dryer -- scrap it (via free stuff on craigslist)
old washer -- sold on craigslist
we're big fan of craigslist here

saturday -- the day before the delivery
paint and clean laundry closet
old water valves corroded and must be replaced
big thanks to the inventors of SharkBite
saved me the hassle of soldering
also put down a click-n-lock floor from IKEA that we originally picked up to put down in two closets


super bowl sunday -- delivery day
notice "corner of concern" (seen above) and wonder if the door to the new, front-load washer will open when pushed over against that wall
new set is delivered and the guys couldn't be happier to tell me the door won't open, which means they get to leave everything sit right where it is and hightail it out the door (so they can get home to watch the super bowl, of course)

two options: stack them or remove the corner
after a bit of thinking and a call to my "general contractor" (i.e. dad) the decision is made to remove the corner-- no problem, right?
yeah...except that when I removed the drywall, it became apparent that this corner was actually a load bearing post

4:30 -- two hours to kick-off
quick run to the home depot to get a basement jack
[as a side, let me just add that if you want home depot all to yourself, 4:30 on super bowl sunday is the time to go]
install basement jack

6:00 -- half-hour till kick-off
sawzall support post in middle and use leverage as your friend
pull the bottom of post, realize it was set directly into dirt (some 54 years ago) and has since rotted out -- so it wasn't actually even sitting on anything (or bearing any load)
remove some more drywall so I can cleanly rebuild the opening
grab a bite to eat at some point early in the second quarter

clean up
install new washer and dryer

run a load of towels (!)
rewind to halftime
enjoyed an entertaining halftime show (madonna + lmfao = good fun) and a great second half of football


plan going forward is to build a new corner post in the remaining section of wall that remains

18 January 2012

kitchen [counters + running water]


Backtracking a few weeks...

The week between Christmas and New Year's proved to be very productive, as we had our counters installed and welcomed back running water to the kitchen.

We hired out the finish plumbing. Again, not because I couldn't do it, but mainly because I certainly couldn't have done it as well as this:


I almost hate to put doors on the sink cab and cover this beautiful set up!

Finishing work continues on the kitchen; although we've had a bit of a diversion in dealing with the removal of our tile floor in the lower living room. More details to come...when we have a moment to jump on here again!

22 December 2011

kitchen [we've got gas]

Propane to be exact...

Hello new tank.

Thanks for stoping by, LG double oven and microwave.

And welcome...you beautiful, blue flame!

21 December 2011

kitchen [cab install]

I may be back at some point to highlight some of the custom work we did, but in the meantime, here is a pictorial account of the install...

day one


 day two


 day three

test to ensure 30" sink cab holds the weight of a 15-month old -- it does