Showing posts with label Paint. Show all posts

10 February 2013

bathroom [paint]

Sherwin-Williams 7506 Loggia on the roller.
Dubstep on the Pandora.
And we're good to go for a one-man painting party!

My "sword"
my "sword"

Zinsser Smart Prime
P1080613

Third (and final) topcoat
P1080668

13 November 2012

work [in progress]


"Widespread rumors of this blog's demise have been greatly exaggerated."

-Troy Mouer, Kingswood Redux

Quick update: We have multiple renovations going at once and are trying to plan a complete main bathroom overhaul as well. Oh yeah...and a 2-yr old! So blogging has definitely taken a back seat to real life. BUT...we're still very committed to the blog and hope to bring it up to date at some point. We don't just want to show before and afters because those aren't the kind of blogs that we found helpful as we took on many first-time DIY tasks. As always, thanks for stopping by and stay tuned for more!

20 May 2011

nursery

You may recall the peek inside the nursery from a while back. We finished the room shortly thereafter and the little guy arrived in September; but the first-time parent thing kicked in and it's taken us a while to finally capture some pictures of the room and get this post together.

We didn't stray too far from our design board, just the typical subsitutions when you can't source a certain product, find something better or simply don't want to spend the money on another one (I'm talking to you, Eicho Crib).

Although my wife made a lot of the design calls, let's face it, the true foreman on the job was our cat. Big thanks to Chance for your excellent leadership throughout this facelift of a project!

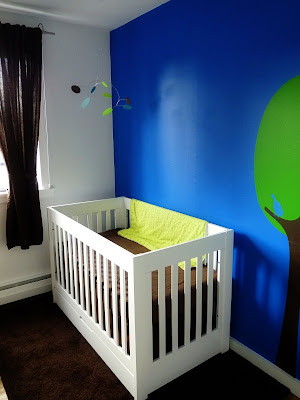
Let's talk paint first. This room had a short-lived stint as an office, whose walls were painted using Behr's Ultra Pure White so we would have a blank slate to work with later. So all of the white you see in the nursery remained the same. The major splash of color came in a deep blue feature wall, which would anchor the white crib. We choose PPG's pure performance -- its a zero VOC paint that received excellent feedback on various online professional painter forums. I echo these reviews -- excellent coverage, true color and no noticable odor. Cobalt Stone is the proper name of the blue, and Leap Frog the green, which you'll see in later pictures.


We'll start the tour of this small room at the aforementioned crib. Regular readers of Apartment Therapy's ohdeedoh should recognize this at the ever-popular, low-budget/high-quality BabyMod Parklane. We loved the clean, simple, modern-look. And the drawer on the bottom added valuable storage in the small space. Speaking of that drawer, it's a hack of sorts, although the only thing I did was slap on a few coats of the Ultra Pure White High-Gloss to cover the original honey-stained drawer front. The rug, curtains, rod and blackout shade are all IKEA grabs. My wife made a skirt for the crib (needed when raised to the highest mattress position) using the excess fabric from the curtins. Oh...and the perfectly modern mobile is the Big Dipper Baby Mobile (small) from The Wonderland Studio.

We thought about painting a tree on the wall, but decided that we liked the clean lines of a vinyl wall decal from Leen the Graphics Queen. Leen was great in working with us on a custom size and sent out tons of color samples before we placed the order.

A simple turn of the head takes us to the next stop on our tour. I could make up a catchy name for this corner like "the reading nook" or the "chill corner," but let's face it, when the boy was little (0-6 months), we rocked him to sleep and did a few feedings on the IKEA rocker -- the IKEA bookcase just looked cool. Now that he's bigger (8 months), he pulls himself up and stands here by himself, tortures the cats when they lay on the rocker and pulls most of the books off the shelves and toys out of the baskets; and that's only when he's not trying to get into the trash can next to the dresser (which you haven't seen yet).

The rocker, which I suspect has been discontinued because I can't find it on the website, is fairly comfrontable for putting the kid to sleep, but not so much when you need to get up while holding said kid -- its a bit low to the ground and deep in the seat. We're looking forward to the book readings that are sure to happen in the future. You know, the ones where the kid can jump on and off your lap without you having to pick them up and put them back down!

Also note the bear on the bottom shelf -- mine from when I was a kid. His name is Bandit, after the dog on Jonny Quest (one of my childhood cartoon favs)!


A closer inspection of the featured art in this corner reveals more vinyl, this time Birds On A Wire Squares from Byrdie Graphics. In their truest sense, they are meant to be adhered directly to a painted wall, but we wanted to add a bit of visual interest to the wall. So we purchased a sheet of birch plywood from the Home Depot and had them cut it down into squares. After a bit of sanding, we slapped on the Leap Frog paint, installed the hanging hardware and went about hanging them as level as possible. No magic or special tricks to speak of, just a Hang & Level, a touch of math and a little patience! 

Let's see...modern piggy bank from Amazon.com (I believe) and the beautiful wooden stacking toy from Little Sapling Toys. Paired with some plastic greenery and one of our favorite reads, no matter your age!

Our final stop on this short tour does require one to turn in place. Hopefully you're not exhausted, yet? IKEA MANDAL -- this dresser not only looks great, but it's a pretty solid piece, as far as IKEA furniture goes -- solid birch casing with solid birch drawer sides and backs. A pretty nice piece that should take us well into the teenage years. But make no mistake about it, the star here is the BabySmart Cooshee Changer (Lime). We absolutely, 100% love it, recommend it and can't imagine diaper changes without it. 


We leave you with an unstagged shot of what the nursery looks like on a pretty average day, just imagine a few more books and toys strewn around the floor these days!

05 March 2011

Base + Case

So I've become THAT guy. You know, the one who still has a Christmas post up in early-March. Not much going on around here redux-wise, hence the lack of posts. IKEA kitchen planning is underway, but no where near the time to begin sharing that. I do have some older redux highlights(?) that have yet to be posted, so journey back in time with us.

All of the baseboard and door casement in the house was the standard that was available in 1958. Surprisingly, its still the same design that you see in many houses built today. I'm not sure if that's a testament to its staying power, or pure apathy on the part of home builders and consumers. You can debate that in the comments!

As you can see, it was all pretty beat-up (from when the carpet was laid) and had multiple layers of paint. So when we ripped out the carpet, the base and case went with it -- those were the first two projects we actually completed in the house. We lived for quite some time with no trim in the majority of the house, even after the floors had been refinished and the walls painted.

It wasn't until Spring of 2010 when I finally got around to the task. My dad, who knows his way around a miter cut, came up for a few days and we were able to knock out many, many linear feet of base and door case. I went with a squared-off poplar 1"x4" base and 1"x3" case. These particular dimensions don't come pre-primed, so I spent the week before install priming and double-coating every single piece of trim. It was a lot easier prepping these pieces on sawhorses in the garage than on my hands-and-knees after installation, so I would highly recommend this approach. There's no doubt you have to go back and touch up a few areas, but you do this when you go back and fill the nail holes anyway, so it worked out. I borrowed a nail gun from a friend, which proved invaluable. In fact, I would suggest either purchasing your own, or renting one to complete a job like this, especially for a DIY'er. Trust me, you'll be running in and out of the house measuring and cutting multiple times for each piece of trim and the time the nail gun saves is just phenomonal. Not to mention the lack of any hammer mis-hits, either on your finger or the piece of trim itself.


And here's a shot that gives a good sense of the depth of the trim.

I used the same base trim for the stairs. The "go to" piece of trim here would be a piece of quarter round, but I wanted a more modern, chunky look. I should also note that I used a 1"x1" square piece of poplar for the transistion from the floor to the step riser.

 The final piece of the puzzle was the trim for the three-steps that lead from the ground floor to the middle floor of our split level. Again, the typical "go to" is a piece of quarter round, which I was looking to avoid. But the base I used for the other steps wasn't going to work here, as it was too deep. So I ended up going with a 1/2"x4" piece of poplar.

It was a big job, but well worth it in the end.

17 January 2009

Ikea Hack

I'm the type of person who would go 3 years without a necessary piece of furniture solely based on the fact that I could never commit to a piece that will essentially become a permanent fixture in the house. My wife, on the other hand, is not.

So when we moved into the house back in March08 and found ourselves in need of a TV unit, I was perfectly content to use a sturdy box and begin the long search for the perfect, affordable piece. My wife, on the other hand, was not.

Scene shift. So we find ourselves in the middle of IKEA wandering around looking for a solution, a middle-ground if you will. We settled on the BONDE TV Unit, but only if I could change out the hardware and paint the two front drawers a glossy white. Both parties agreed.

And here's one for the "Don't Try This At Home File"

When we bought the TV Unit, I purchased a few packs of the BESTÅ casters. My plan was to install one on each corner and another in the middle for support. The idea was to get the unit off the floor a bit, add a little character and otherwise compliment our Blu Dot Chicago cocktail table.

From the moment I opened the box and saw the bottom of the unit, I had this gut feeling that it wasn't gonna work. It's not like I was expecting the bottom piece to be solid wood or anything, but it wasn't even solid particle board. (!!!) Rather, it was a thin piece of "sturdy" cardboard with that "waffle" cardboard filler.

But the lure of the finished look that existed in my mind was too much -- so I dived in with a drill bit and some Gorilla glue. I let the casters dry upside down for 24 hours and flipped it over to see if it would stand. Surprisingly, it did. But not for long.

I'll spare you the messy details, but it involved my wife and I tying to save a 165 lb. 32" TV from crashing into the ground when the less-than-soundly-attached casters gave way under the weight of the TV as we were rolling the unit. Somehow we managed to save the TV, but the hack was a bust.

Nonetheless, I was determined to make the casters work. So I purchased up some nuts and washers from the local hardware store and a wide, hollow drill bit. I drilled the holes and fastened the nuts/washers to the casters, hoping to get enough surface area to adequately secure the casters to the unit. Had the bottom been at least a strong particleboard, it might have worked, but the thin piece of "sturdy" cardboard just wasn't strong enough and I had to scrap the idea.

Here's the close-up:


Related: Plastolux's TRÄBY Hack

16 November 2008

Window Trim

Just when we thought our painting woes were behind us, it came time to paint the knotty pine window trim in the living room and dining room. I can't even tell you how long I put off the task. Give me a roller and I'll paint any room, any time. I'll even trim out the corners and ceilings. But painting multi-layered trim around our four windows in the living room and two in the dining room is not my idea of remodeling fun.

Backtracking for a second...we decided to highlight the archtichtual aspect of the sloped ceiling by painting a geometric shape on the walls that lined-up with our windows using Behr's Dark Ash, the same color we had used to paint the beam that divides the two rooms. Here's the best "before" shot I have of that:


Our plan was to paint the window trim surrounding the windows that same color. I spent one Saturday morning prepping the job, which included taping, removal of the window hardware and filling the holes that are natural to knotty pine. I spent the next Saturday painting. I started off with an oil-based primer, much like I did with the stair risers.

I put on one coat of the Dark Ash and just wasn't feeling it...


Much like the steps, it was just too dark and all blended together. I consulted with Angie and it was quickly decided that we needed to go a few shades lighter, but yet not as light as the wall color. We also needed to step up the sheen. We decided on Gray Area in a Satin Enamel sheen.

Here's what it looked like at the halfway point:


And now we come to this:


Lessons Learned:

Painting the frame around the window itself can seem like a daunting task. For one, you have to be careful not to fill up the channel where the window travels up and down, so that the window will still work properly once you've finished. And then you have to mess with the hardware, which may or may not be easy to remove. Hopefully you don't have to mess with multiple layers of age-old paint and stripping them off. And then, on top of all of that, you have the window glass itself to worry about. Do you tape it? Will the paint come off my window if I accendiently get some on it?

Problem solved with this great tip I found over at 1951 Ranch Redo. When it came time to paint my window frames, I was just about to tape the glass when I remembered reading this at one point. I was sick of taping anyway...so I just jumped right in and painted the frames without worrying about any paint that got on the glass. Using an exacto knife and a razor-blade scraper, the paint easily scrapes off the window. The key to the process is scoring the glass right along the edge of the window before scraping.

15 September 2008

Up : Down


To add a more modern feel to house, we decided that we would paint the stair risers, instead of having them refinished along with our floors and stair treads.

I started off with an oil-based primer. I went the oil-based route based on some research on properly painting over wood that had originally been stained and sealed with poly. This stuff was recommended to ensure proper adhesion of the water-based top coat of paint.

Two coats of Dark Ash to the risers and trim beside the stairs. And the results:


We lived with it for about a month and decided we just didn't like it -- the dark paint color didn't allow for any seperation in the shape of the stairs -- depending on the time of day, the stair treads appeared to float, but not in a good way.

The fix was fairly easy -- since our baseboard and trim around the rest of the stairs would eventually be painted white, we decided to just paint the trim around the steps white, and leave the risers in the Dark Ash. The final results, after two coats of white:


UPDATE: Apparently West Elm liked our stairs so much they borrowed them for a photo shoot!

23 August 2008

Saved by a gentle rain

As I mentioned in a previous post, we bought our paint from Home Depot during one of their big sales. Thus, I certainly didn't buy too little (and ended up buying way too much). As for the colors in the major area of our house -- the living room and dining room (both of which have sloped ceilings) -- we selected Manhattan Mist (main color) and Distant Thunder (accent color). We had actually chosen two different colors at the store, but when we brought the sample strips home, we decided they were too dark for the space and not exactly the look we were going for. When all was said and done, we purchased 7 gallons of the Manhattan Mist.

So fast forward a number of weeks. My parents were cool enough to take a couple days off work to come up and help us paint. We prepped all Friday morning and began painting just before Noon. My dad and I were trimming out and I thought the Manhattan Mist was going on good. It was about an hour before my dad picked up a roller and started on the major portions of the walls. About a half-hour later, I remember looking back at the wall where he started and thinking that the color looked a bit on the purplish-side of gray, which was not the look we were going for either. The more and more paint that went on, the more and more purple came out. It took the rest of the afternoon to finish the second coats of trim and rolling.

I expressed my concern a number of times, but always managed to talk myself out of the expense and work that would come along with changing the main color. I mean, it wasn't looking like Barney purple or anything, there was just a slight purple hue to the gray. It wasn't until later that evening, when the sun went down and the lights came on inside the house that my worst fears were realized. The entire area looked like something an 8-year old girl would choose for her bedroom; albeit a very sophisticated 8-year old. Not that I have anything against 8-year olds, it just wasn't right for the main living area of our house.

Saturday morning rolls around and as we all gather to begin the day, I finally make the call that Angie and I need to take some time to think about and discuss our options for changing the color. So we pulled out all of our samples and dialed up Behr.com. We narrowed it down to two colors and walked around the house looking at them under different light conditions. Finally, after seeing it all, we both decided on Gentle Rain (main color) and Dark Ash (accent color). And it proved to be one of the best decisions we've made yet!

We jetted off to Home Depot and bought a gallon of each. Came home and rolled it on a wall and waited for it to dry (paint always dries darker). It dried just as we hoped and Angie returned to purchase 3 more gallons. Although we lost a day of painting, we gained a color we love!

Capturing accurate representations of paint hues in a digital photo is nearly impossible, but I'll give it a shot anyway. Walls are Gentle Rain. Beam is Dark Ash. Ceilings are Ultra Pure White.


And now we come to this -- our lessons learned:

1) Sample strips are NOT enough, especially for the main areas of your house. Buy a sample container or quart of your desired color, slap it up on a good-sized area of your wall, wait for it to dry and then observe it during the day time (natural light) AND the night time (artificial light). We almost could have lived with the Manhattan Mist during the day, but the night brought out the true nature of the beast!

2) Make the call. As I mentioned, if you're feeling a bit worried about the look of the color when it first dries, chances are it's not going to get better with time. Conduct a "team meeting" and decide before you waste more time slapping up a second coat while hoping for a miracle. And don't just take my word for it. Note: This may not be true of some colors because sometimes its hard to see the true color without a second (or third) coat.

3) Don't get caught up in the hub-bub of a big sale. Although we did take our time in originally selecting a color, we bought way too much and didn't have time to test paint our rooms.

4) Your turn -- please share any similar lessons you've learned in the choosing paint colors and/or painting areas of your home.

24 July 2008

Looking Up

Although our living room wall (at 13') and sloped ceiling add a unique architectural element to our house's interior, they pose quite a challenge when it comes to painting. So when it came time to paint the living room ceiling, I looked into the possibility of renting a small section of scaffolding. Turns out that with a little planning and the right vehicle (umm...a truck) you can rent a set for about $25 per day. In our case, it was well worth it.

My dad managed to roll the bottom-half of the ceiling with his 8'-16' extension pole, but it would have been a real struggle to get clean coats on the upper-half without the scaffolding. Not to mention the ease of trimming out the corners and edges while standing on a flat surface (instead of having to balance on a ladder and then going up and down it a million times). I almost stepped off of the catwalk a few times (I guess I was REALLY getting into the painting), but luckily managed to avert any major disasters! We easily got two coats on in one day and were able to return the scaffolding later that evening.

We didn't finish all the ceilings as we had originally hoped. As we were removing the old flush-mounted light fixture in the guest bedroom, a piece of the textured ceiling came loose. In fact, it just peeled away with very little effort. We debated about what to do -- patch it or remove it -- and finally decided to try and remove all of the texture down to the original drywall. We used putty knives and I would say that 90% of it peeled off with little effort; BUT the other 10% was about as tedious as it gets.


And I don't even want to think about the heavy "starlight" texture on the ceiling in the office. We still haven't figured out what to do with it; but that's for another post.

21 July 2008

Wall Work

Man...the walls in this place are really working us over! If the wall-o-wood wasn't enough, we found "buried" wallpaper on 3 different walls -- buried in the sense that the original wallpaper had been painted over numerous times. Our first discovery came when a corner of the wallpaper started to pull away in the dining room. We didn't just want to cut away the peel, repair it and add another coat of paint. Since the discovery of our wood floors, and their impending need to be refinished, we decided now was the time to fix the walls correctly.


Using putty knives and water soaked sponges, we were able to wet the wallpaper and scrape it off of the dining room wall. Interestingly enough, as you can see in the picture above, the wallpaper only covered a portion of the wall -- we're thinking it was a mural of some sort. Anyway, it revealed a ton of nail holes to be repaired, two cracks and the two large seams, all of which you can see above. We did our best to skim-coat it with drywall compound in trying to blend the cracks and seams into the existing painted walls. The results, after a coat of Kilz:


Time for an easy one -- the master bedroom. While removing the baseboard I discovered this lovely wallpaper.


Sweet, huh?!?! As you can see, this wallpaper had also been painted over. My first thought was "Oh no, not again." However, after further inspection, I discovered that the wallpaper glue had completly "dried-up" and, no lie, I was able to gently pull each individual section off the wall in a complete strip, paint and all. Below is a pic of the wall with about two strips left to go. You can even still see the pencil lines drawn by whoever was hanging the wallpaper!


Oh, and much like the dining room wall, the original owners had only put the wallpaper on one wall, so that was definitely a positive. After it was all removed I used a plastic putty knife to chip away all the loose glue particles, re-set the old drywall nails, patched the holes and two coats of Kilz to cover the greenish color left behind by the glue residue.

Finally, we turned our attention to a wall in the office. This wall had also originally been wallpapered, but then painted over. Do you see a theme here?!?! This job mirrored the dining room removal process -- water and scrapers to remove the paper (and paint) and then the messy job of patching holes, repairing minor cracks and two coats of Kilz.

03 July 2008

Gallons + Gallons

Behr paint has come highly recommended (from others besides Home Depot), so when I stumbled upon a huge July 4th sale at HD, we had to jump on it!

We had been discussing colors since we moved in (March 08), but hadn't done so much as snagged a color strip from a single store. Angie managed to grab some early in the week that were in our desired color ranges. Then we spent a good 2 hours at the store fine-tuning those colors. We decided on most of what we wanted for the living room, dining room and the bedrooms and took the sample strips home to "see them in action" there. This turned out to be a super-important step b/c we decided that the wall color we loved for our living room and dining room (Porpoise), was a bit too dark for our space. After some more fine tuning, we headed back to the store and placed our order -- the results of which you can see in the pic above.

We'll be doing all of the ceilings in the aforementioned rooms this weekend. Walls and trim to follow. More info on colors and pics after we get it on the walls!

30 June 2008

Wall-O-Wood

BEFORE

I would venture to say that this wall, combined with the sloping ceiling, is the main feature element of our house's interior. So one of the first things on our list was to remove the rustic wood paneling and put drywall in its place. But this was not the thin, laun paneling you're most familiar with. This was solid, heavy plywood-type sheets. We spent the better part of two weeks working to remove it. A pleasant surprise occurred when I removed the first piece of corner trim and discovered that the original drywall was still in place and that the previous owner had used 1"x2" furring strips in order to attach the paneling. Thus, my job went from demo and complete drywalling to demo and patching. Definitely a good thing. We did end up hanging some new drywall on the stairwell to build out the depth of those walls.


Even though we tried to be careful, we made a mess of the wall removing the heavy panels. And the furring strips didn't exactly come off with ease either. In a sense, I became one with the two ladders and my drywall mud as I went up and down patching nail holes all over the 13' x 10' wall.

AFTER (one coat of Kilz)

Even with just a double coat of Kilz primer, it's looking a lot better. Can't wait to get the finish paint on there!