
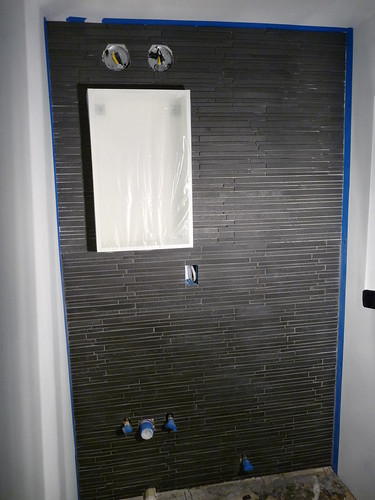
Our first venture into tiling is complete and was, in our humble opinion, a success. Prep work is extremely important when it comes to tiling -- use the wrong adhesive for your tile and substrate, or the wrong sealer, or the wrong procedure (especially as to timing of steps) and your entire project could be jeopardized. We're not big into thoughtlessly throwing money around, so I did a bunch of reading, and searching, and more reading over at the John Bridge Forums. I can't thank all the pros and experienced DIYers over there enough. Their archives are so extensive that I didn't even have to start my own thread -- all of my questions had been previously asked and answered. And I learned a ton along the way about general techniques, procedures and various products.
We chose a tumbled marble stone that had a stacked-stone look to it. The long and narrow stones came pre-glued onto 12"x12" mesh sheets. We first found the tile online at the Natural Stone Outlet and were literally shocked to walk into our local tile store a few days later and find that they had just recently started selling it. The local price was about $3 per sheet higher than the Internet price (even with shipping), but given the economy and this paradigm shift in my mind that I don't have to absolutely get the lowest price on every single item I purchase and that service really does matter to me, I was happy to give the guys at Gipe Flooring & Wall Covering our business. And they were great in answering my questions, letting me test some things and generally helping me out with some miscellaneous materials along the way.
Unless you drop a comment asking about something specific, I won't bore you with the step-by-step on hanging, grouting and sealing our stone. I wouldn't even know where to begin. I will say that it takes a ton of time and patience. I'm short on the latter, so much gratitude goes to my extremely patient wife for helping and putting up with my little rants during the process.
One recommendation I will share is that you consider purchasing your own tile saw for a job like this. I actually got a great deal on a mid-level clearance model at Home Depot, and would highly recommend the Husky THD 750L to a DIYer -- they are practically giving them away right now!! It's just that the job will take more time than you expect, and you can't rent a saw very much longer than a day or two before the costs start to equal out. And the last thing you want to be doing is rushing around making cuts with a tile saw. Plus, we plan on using tile in our kitchen and main bathroom renovations, so at that point, the costs of buying outweigh that of multiple rentals.
We're on to an unexpected plumbing job -- replacing the toilet flange -- and then need to finish up the electrical, install the flooring, get the new fixtures in there and then finish up all the little details. I'd love to say that the next time we check in, we'll have the reveal, but I thought that when I posted a month ago -- so we'll make no promises. Hopefully sooner than later.
+copy.jpg)


8 comments:
Troy, I don't know what your toilet flange issues are, but this did the trick in our bathroom remodel: http://www.oatey.com/Plumber/Shared/ProductGroupDetail/106/Cast+Iron+Flange+Replacement.html
Thanks Chris -- this is the route I would have gone had I not had a plumber in the family. He "made" me bust out the old flange and put a new (cast iron) one in.
GORGEOUS tile...and really nice job! Sorry about the flange...I know that's a real pain in the arse. You will be so stylin' when you're done!!!
oops didn't mean to be anonymous...great job Troy!
I am in awe! Can't wait to see the final, but those tiles are gorgeous. Such meticulous work must have required inordinate patience. Lovely!
Hi Troy and Ang, I enjoy your BLOG and the tiling update. We live in Lemoyne and have a 1951 MCM and we want to tile one wall in our back bedroom bath. We want HEATH tiles www.heathceramics.com/go/heath/tile/ bow ties or diamonds but at $77 a 10 by 10 wall is $7700 plus shipping from Sausalito would be a total of $8 grand. I like your tile and I wondered where a decent place is to look at tile. I want to drive to Lancaster to Tileology. Also, Mod Craft has some cool MCM tile online. $48 sq. foot. Good luck with your project. Your place is awesome. Paul & Ron.
Paul -- Thanks for stopping by! You're the first local person I've heard from. Be sure and keep us updated on your project and any other local MCM happenings.
On the tile question, we’ve never been to Tileology in Lancaster. Other than the two places I mentioned in the original post, here's where we looked:
Local
Harrisburg Wall & Flooring
They carried some different tile than Gipe and I remember making a mental note to re-visit when doing the kitchen and main bathroom.
Conestoga Tile Showroom (Harrisburg)
Not much in the way of MCM or modern tiles here – their focus seems to be the traditional, mass appeal market.
Online
modwalls: http://www.modwalls.com/
Hakatai: http://www.hakatai.com/
Mosaic Tile Supplies: http://www.mosaictilesupplies.com/
Troy,
It's been too long since I've visited. What on oversight on my part. You've been busy and knocking out a hell of a job. Killer stuff. That tile is on the docket for when we make it to the bathrooms. Will continue to stalk your progress more closely.
Cheers,
-Baz
Post a Comment