

Showing posts with label Kitchen. Show all posts
Showing posts with label Kitchen. Show all posts
19 November 2012
10 May 2012
kitchen [countertops]
A number of readers have asked about our Cambria White Cliff countertops. We really like them! It's exactly what we were going for -- as pure white as you can get with quartz. However, there are two issues related to markings that need to be shared -- black spots and edge markings.
Black Spots
White Cliff has the potential to show black spots (but we knew that before-hand) -- ours has two.


Here's the background -- The following notice is found on Cambria's website and the back of the sample: "White Cliff™ is a unique, pure white color and can show markings caused during normal use."
I remember reading this just before we signed the contract with our fabricator/installer. Naturally, I needed to know more. Here's the email trail between me and the local fabricator/installer I was working with:
Me: Can you or your Cambria rep give any further insight on this statement -- its rather vague. I understand its a very pure looking color, with hardly any flecks/specks, but the finish itself is the same (as the Whitehall, for instance) and I'm not following how it will mark -- scuff? chips?
Local Fabricator/Installer: The further insight that I can offer you is what Cambri notes on our price list and I have copied and inserted below for you. The White Cliff is just as hard and “scuff proof” as any of the other colors in the line and equally as with the Caesarstone. BUT, we nor Cambria will address any dissatisfaction with regard to their precautions noted below.
Edge Markings
 After using the countertops for a week, we noticed that the edges show markings from where a belt buckle or jeans button would contact it. This is mainly apparent at the sink, where we do most of our leaning against the edge of the counter; but it also appears at any place where we do any amount of prolonged work. The good news is that we are able to wipe off these marks with a Magic Eraser.
Bottom Line
We'd make the same decision again!
Update: Having now lived with the counters for ~5 years, we would not make the same decision. If you'd like more info, drop us an email.
Black Spots
White Cliff has the potential to show black spots (but we knew that before-hand) -- ours has two.


Here's the background -- The following notice is found on Cambria's website and the back of the sample: "White Cliff™ is a unique, pure white color and can show markings caused during normal use."
I remember reading this just before we signed the contract with our fabricator/installer. Naturally, I needed to know more. Here's the email trail between me and the local fabricator/installer I was working with:
Me: Can you or your Cambria rep give any further insight on this statement -- its rather vague. I understand its a very pure looking color, with hardly any flecks/specks, but the finish itself is the same (as the Whitehall, for instance) and I'm not following how it will mark -- scuff? chips?
Local Fabricator/Installer: The further insight that I can offer you is what Cambri notes on our price list and I have copied and inserted below for you. The White Cliff is just as hard and “scuff proof” as any of the other colors in the line and equally as with the Caesarstone. BUT, we nor Cambria will address any dissatisfaction with regard to their precautions noted below.
White Cliff is an extremely pure bright white that will show markings during normal use. It may contain some small black or other color variations or spots and these should be considered during your layout process and worked around if possible. During the manufacturing process every effort is made to minimize these issues but they can not be totally eliminated. Please take extra care during your inspection and layout process to identify and address these issues.
It is extremely important that you educate your customers and set the correct expectations prior to starting any fabrication! Variation in the natural quartz in all Cambria color, pattern, size, shape and shade are inherent and unique characteristics are to be expected with the product. These variations do not affect product performance. Please be sure to thoroughly inspect all Cambria slabs prior to starting any fabrication. Thank You.
Edge Markings

Bottom Line
Update: Having now lived with the counters for ~5 years, we would not make the same decision. If you'd like more info, drop us an email.
18 January 2012
kitchen [counters + running water]

Backtracking a few weeks...
The week between Christmas and New Year's proved to be very productive, as we had our counters installed and welcomed back running water to the kitchen.
We hired out the finish plumbing. Again, not because I couldn't do it, but mainly because I certainly couldn't have done it as well as this:

I almost hate to put doors on the sink cab and cover this beautiful set up!
Finishing work continues on the kitchen; although we've had a bit of a diversion in dealing with the removal of our tile floor in the lower living room. More details to come...when we have a moment to jump on here again!
22 December 2011
kitchen [we've got gas]
Propane to be exact...
 |
| Hello new tank. |
 |
| Thanks for stoping by, LG double oven and microwave. |
 |
| And welcome...you beautiful, blue flame! |
21 December 2011
kitchen [cab install]
I may be back at some point to highlight some of the custom work we did, but in the meantime, here is a pictorial account of the install...
day one


day two


day three

day one


day two


day three
 |
| test to ensure 30" sink cab holds the weight of a 15-month old -- it does |

08 December 2011
kitchen [demo and rebuilding]

And the rebuilding has begun.
There are, however, no photos that document the demo process. Just so happened that the day I picked to demo, a freak, pre-Halloween snow event of sorts knocked out our power for about 12 hours. So I was literally ripping drywall off the wall in the near dark, save for a small utility lamp plugged into my neighbor's generator. I also had the fridge plugged in, but that is beside the point.
Electrical was the next logical step; and took way longer than expected. It occurs to me that everything DIY always takes longer than expected...so why don't we all just realign our expectations -- then everything would be finished on time. Here are some of the highlights:
- In-wall low voltage lines for LED undercabs
- Had to re-route a bunch of lines to account for a new microwave placement, new gas stove (goodbye 220v), new recessed lighting and a new pendant light. Amazingly enough, all of the receptacles ended up being in good locations, so we just switched out the boxes so everything would be consistent.
- Ran wire for new switches and recessed lighting
- Relocated our heating thermostat from the upstairs hallway to the main floor, in hopes of keeping the house more comfrontable during the winter.


Next step was adding a bit of new insulation to supplement the blown-in (from the previous homeowner's 90s remodel), the majority of which I was able to save, even through the drywall demo and new wiring.

Followed by the old floor removal and new luan underlayment for the Forbo Marmoleum. I ended up hiring this job out in order to save time -- the weekends are just too short, especially once I pulled out the plumbing.
In that same vein, I also hired out the new drywall install. Maybe a DIY sin in some people's eyes, but I believe its well worth the time-saved and a wise investment for the money. My installer is at the house doing his first sanding and recoat as I write. He expects to finish up by the end of the week. So it looks like painting is on tap for this weekend.
Cabinet install is scheduled to take place next weekend, as I was able to pull in my dad and brother for two straight days of IKEA kitchen fun. The counter templating is scheduled for the Monday after, so the pressure will be on. Looking at the extended forecast...it appears we might just have counters and running water by New Year's Eve.
07 December 2011


23 November 2011
kitchen [countertop decision]
 |
| Cambria's White Cliff (image via Cambria's website) |
Let's just say those quotes stayed in our pockets through many washes! As I've mentioned before, our first child came along and put the brakes on a major kitchen renovation -- kinda hard to fiddle around in your house when you have a small little human who needs all of your attention, which was happily given, I'll add.
So when we finally got the little man somewhat figured out and started to focus on the renovation again, a few things changed -- namely the cabinets, as we decided to go with IKEA's high-gloss gray and white (ABSTRAKT). When the time came to consider counters again, I simply sent out a few requests on the Caesarstone Blizzard, in order to get some updated numbers. As a side, I was amazed by the differences in the quotes I got back, as there was a $2,300 margin between the highest and lowest quotes, with the rest falling somewhere in between. Even more puzzling was that the two lowest quotes were actually given by the companies who I knew would produce the highest quality install, which is just as important as the counter material chosen.
After choosing a company to work with, I started to review their proposal and it occured to me that we should probably visit the showroom again (duh!), with our new doors and backsplash intact, and take a look at the Blizzard against them. Well...let's just say Blizzard was the first color we eliminated. In sum, it wasn't the perfect white for the high-gloss whites and grays. We went through all of the quartz samples (from the various companies) and had a hard time deciding between Caesarstone's Pure White and Cambria's White Cliff, which was the whitest of the two. So I asked for prices on both. Turns out the Cambria product is all but a $1,000 less than the Caesarstone Pure White. And Cambria is manufactured in the United States (maybe the overseas shipping accounts for the price difference between the two?), so it has that added "green" value to it.
So the decison was made -- White Cliff.
20 October 2011
kitchen [starting to feel real]
The kitchen has been a mess ever since I removed the old railing almost two years ago. We delayed the kitchen renovation last year this time to focus on the birth of our first child. At some point after everyone put up the new 2011 calenders, I got the redux bug again. Sometime in early-Spring, I worked up a design board and presented our initial design here. That design went through a number of changes and we finally got the kitchen ordered in late-Summer and delivered in early-Fall. About half of them are built and waiting patiently in our garage for the big install -- but that's still a few weeks off.
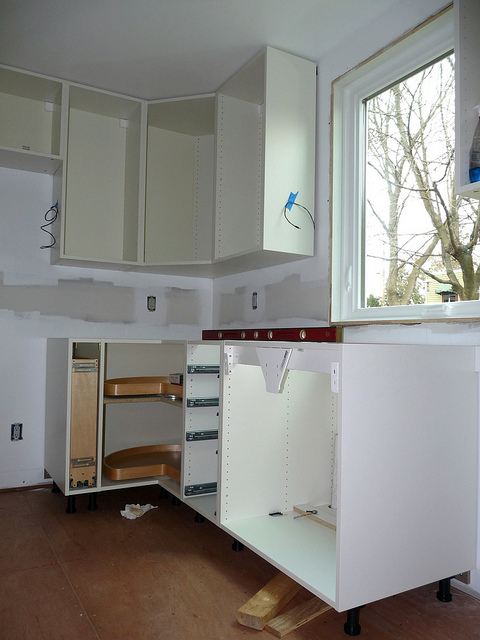
Even with all of that activity, it wasn't until this past Saturday, when my dad and I removed one of the existing wall cabinets (for the new window install) and then started to rework a bunch of the electric, that this feeling came over me that this whole kitchen redux is actually going to happen. At some point this week, Angie and I both said: "Wow...this feels real!"
And that feeling was only intensified today when I arrived home from work to this:
 That's a newly installed Pella 350 Series casement window, for those following along at home.
We hope to finish the new electrical this weekend, begin some drywall demo and then take a serious look at the remainder of the DIY work schedule to put in place a plan that will keep us in a somewhat working kitchen until all the little pieces can fall into place so that we're ready for the new cabinet install. My plan is to blog as many of the little steps along the way as I have time to. Stay tuned...
Even with all of that activity, it wasn't until this past Saturday, when my dad and I removed one of the existing wall cabinets (for the new window install) and then started to rework a bunch of the electric, that this feeling came over me that this whole kitchen redux is actually going to happen. At some point this week, Angie and I both said: "Wow...this feels real!"
And that feeling was only intensified today when I arrived home from work to this:

We hope to finish the new electrical this weekend, begin some drywall demo and then take a serious look at the remainder of the DIY work schedule to put in place a plan that will keep us in a somewhat working kitchen until all the little pieces can fall into place so that we're ready for the new cabinet install. My plan is to blog as many of the little steps along the way as I have time to. Stay tuned...
28 September 2011
kitchen [final design]
We finalized our kitchen design in August thanks to some helpful comments on our initial design from some of our readers here, as well as "personalshopper" over at IKEAFANS. We're very pleased with the modifications to our initial plan. The most significant change, remodeling-wise, was the decision to move the only window in the kitchen. In order to keep the sink centered on the window, we'll also have to move the plumbing for the sink and the dishwasher. These moves created a domino effect of minor changes that, when combined, give us a more useful layout:
- We switched out the 36" sink cab for the 30" sink cab -- we had originally planned for a 32" sink, but when I actully pulled out the tape measure while standing over our current sink, it just seemed a bit large for what we need, especially considering the size of our kitchen and its lack of counter space. We can certainly get a 28" sink in the smaller cab and, depending on what the countertop guys say, may be able to squeeze in a 30" sink.
- Smaller sink leads directly to increased counter space. In addition, the new placement of the sink increases the countertop area of the critical work zone between the sink and the stove.
- Smaller sink cab allowed us to use the 37" corner cab, which we plan to modify using a kidney-shaped, shelf-based lazy susan, instead of IKEA's center-pole susan.
- Using the 37" corner cab opened up a space to the right of the stove that is perfect for a 5" pullout shelf.
- The 37" corner cab also opened up space to the left of the stove, allowing us to go with a wider drawer cab and counter area next to the fridge.
I should also mention that we were able to finalize the plans during the last week of the IKEA kitchen sale. I didn't want to visit the store on the final weekend of the sale (can't even imagine the chaos), so I took a day off work and ventured down on a weekday. I worked with a kitchen associate who knew his stuff and spent about an hour going over the order with him. Delivery is scheduled for next week -- I keep telling my wife its like Christmas in October! The plan is to store it all in the garage and build it (and they will come) whenever the little guy lets us.
More to come...
11 August 2011
Modern Stairs
Modern stairs come in a wide array of shapes, materials and designs. And I've seen some amazing ones out there on the interwebs -- too many to even think about listing. The photos below happen to be our inspiration shots for stairs that we believe look beautiful, are designed well and work within our modest modern renovation scheme.


Unfortunately, I don't have credits or sources for either of these photos. We're leaning toward the bottom design and I have requests for estimates out now -- one using walnut, another using oak (that would be stained a walnut or ebony color).
Before I go, I should also mention the finish of the wall around the stairs, as seen above. It brings the wall flush (or almost flush) with the stair casing. Here's a better detail shot of that, and another great set of stairs, from the guys over at BUILD Blog:

This look is achieved using a shadow bead or "Z" reveal mold on the edge of your drywall. I'm planning to use this molding throughout the kitchen redux and hope to provide more detail -- from a DIY perspective, of course -- once the project gets underway.
30 June 2011
Modern Guardrails
The latest on the kitchen redux is that we are still in the planning stages. The good news is that I received an email from IKEA yesterday announcing a new kitchen sale that runs through August 21, 2011 -- so I'm confident we'll make that deadline.
The backstory on our lack of progress is that after posting our initial design on the IKEAFANS site, I only received one response. However, it proved to be a very important one. A kind FAN suggested that we move a window to achieve a more beneficial layout. I agreed and went to work to see how realistic it would be to complete. Moving a window is something that I have no time or desire to complete myself, so I need to call in a few contractors for quotes. We're also thinking about having a short run of stairs up to the kitchen rebuilt, so I'd like the contractor to include that in the quote as well. Finally, we need to come up with a modern guardrail solution for the kitchen, and I'd like to float those ideas past the contractors as well.
So that required us to sit down and come up with an idea of the look we're hoping to achieve with the new guardrail. Although I've been collecting inspiration shots over the past couple of years, there are pros and cons to all of them, especially when you throw in an extremely mobile 10 month old (who will only grow older and more mobile).
Here's our current space:
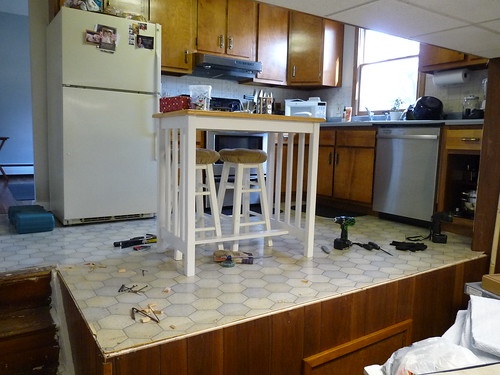 For those looking to get your bearings, you're standing in our "lower living room" looking up to the kitchen. The short run of three stairs is to your left and the lower living room's drop ceiling is visible at the top of the picture. The wood paneling will be replaced with drywall during the kitchen remodel. At some point, I hope to build a floating desk on that short wall.
Here are some inspiration shots that we're considering, along with our thoughts on each:


Pros: Will create sense of openness between kitchen and living room, making the small kitchen feel larger; love the look of the exposed hardware
Cons: Glass + Toddler(s) = Never Clean; although I haven't priced this out yet, I get the sense that this is one of the more expensive routes to take


Plexiglass or 3form
Pros: Creates sense of openness; still a big fan of the exposed hardware; depending on finish, easier to keep clean than glass; suspect plexi is cheaper than glass
Cons: Although not fully researched, I suspect these materials are more susceptible to scratching, 3form is expensive and not easily sourced


Pros: Nice, clean, modern look; creates sense of openness; easy to clean, may be more economical than glass
Cons: Horizontal Rails + Toddler(s) = Climbing Hazard (although I have some ideas for temporary covers/guards to thwart any climbing)


Pros: Modern look; safe; probably the most economical choice
Cons: Not as clean looking as other options; creates a more closed-in feeling


Aluminum, Steel or either material combined with wood
Pros: Vertical balusters are possible, which eliminates the climbing hazard; clean, simple look that creates openness between the rooms
Cons: I suspect custom fabrication would be required here -- run for the hills (unless you know someone or are willing to learn to weld yourself!)
I'll be back at some point with some inspiration shots for the stairs. In the meantime, drop a comment with your thoughts, ideas, resources and links on modern guardrail solutions.
20 April 2011
kitchen [initial design]


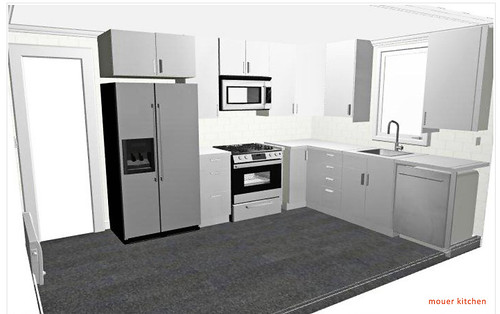
Our initial design in IKEA's Kitchen Planner (must have the Kitchen Planner software installed to view and modify our plan) is complete; and awaits your feedback!
The kitchen is fairly small and somewhat height-challenged due to the previous owner's addition of an attic above it -- the storage space is something we're not willing to give up, but a short ceiling is the trade-off. As is a set of fold-down stairs from attic space that eliminates the ability to place cabinets on one entire length of a long wall. That is the wall with the long "window" -- which is actually the opening that looks down into the lower living room (the split-level feature of our home). Not shown on the plan or stills is the set of 3 steps, which sit in the corner behind the small table and chairs.
As far as our design, we are open to any and all improvements, suggestions and redesigns. I’ve configured the initial redesign much as the kitchen currently exists, save the microwave above the range. Our microwave currently sits in the corner to the left of the sink, taking up valuable counter space. So I was definitely looking to get it off the counter. I also recognize that the wall cabs (at 39”) only leave approx. 16” between the bottom of the wall cabs and the countertop. But I just can’t imagine using 30” wall cabs instead, due to the loss of storage space. 36” cabs would be ideal, but IKEA doesn’t offer them. Any specific suggestions on that issue would be a great help.
Other items to note:
-We’re not opposed to moving plumbing
-We are replacing the lone window with a slightly smaller casement window, which will open up the space to the right of the window a bit.
-We‘re not opposed to consider moving the window either, but it must stay on that wall (as it is the only exterior wall).
-We have a separate pantry under the stairs, so dry goods storage is not a concern in the kitchen.
-There is no trim around the door (which leads to open dining and living room floorplan), so there are no clearance problems with our counter-depth fridge.
Feel free to drop any suggestions or comments here,
or over at the IKEAFANS.com thread.
or over at the IKEAFANS.com thread.
16 April 2011
kitchen [the design board]

So if I state that this is a very crude design board, does that make it any less crude? This is what we're thinking for the [long-awaited] kitchen redux. You feelin' it? I have the design worked up in the IKEA Planner and hope to get some feedback from those ikeafans.com folks and you guys as well. I'll post a link here to the ikeafans.com site when I get that up. As most of you probably know, IKEA has the 10% kitchen sale running through May 1, 2011 -- so we're really hoping to get in there before then to take advantage of that. But I'm certainly not going to rush anything if we're not 100% by then.
As always, stay tuned for more.
23 September 2010
nap

We've been taking a nap of sorts here at Kingswood Redux over the past couple of months.
You might recall that I dreaded getting some quotes on having custom kitchen cabinet doors built to use with our existing cabinet frames. I thought it would be a good way to make use of what are solidly-constructed frame units (even though they do not have the versalitility of modern cabinents). Well, I finally got around to calling a few guys -- some weren't even interested, but I did get two guys to come out and take a look. They both seemed excited and had good experience and I was excited about getting some ballparks from them...but the quotes never came back. I followed up with them for a little over a month, but nothing. I guess they're busy...or something.
By the time I finally gave up on the follow-ups, I realized the kitchen remodel was not going to happen before our first child was born. So I switched gears to focus on the nursery and getting myself and my wife prepared for the birth of our little guy.
That all went down really well and our son was born on September 3. I suspect the next post will be a feature on the nursery and might even feature an appearence or two from the little man. Meanwhile, the haze of the first two weeks of his life is beginning to lift and we're thinking about going the Ikea kitchen route, maybe sometime this winter -- whenever we feel like we have a handle on our new life with him!
Subscribe to:
Posts (Atom)
+copy.jpg)

